3.0 Hello World Alias: Difference between revisions
From Iron Realms Nexus Client Documentation
No edit summary |
No edit summary |
||
| Line 4: | Line 4: | ||
This is an illustration of a basic alias. | This is an illustration of a basic alias. | ||
[[Image:hw-01.png]] | |||
Please note, if you add any text after this alias, it won't work. For example, | With this alias, when a user enters 'sh', the system will instead transmit the command 'say hello world!'. | ||
[[Image:hw-03.png]] | |||
Please note, if you add any text after this alias, it won't work. For example, in the example above the user entered, "sh 1". This will not trigger the alias. | |||
By selecting "Include prefix and suffix", you can include extra text along with your command to the game. | By selecting "Include prefix and suffix", you can include extra text along with your command to the game. | ||
[[Image:hw-02.png]] | |||
Example output: | |||
[[Image:Hw-04.png]] | |||
Keep in mind that this alias is set using the 'Begins with' matching type. This allows you to type additional text following the primary shortcut, which will be attached to the original command. You can view the result in the picture provided below. | Keep in mind that this alias is set using the 'Begins with' matching type. This allows you to type additional text following the primary shortcut, which will be attached to the original command. You can view the result in the picture provided below. | ||
</div> | </div> | ||
Revision as of 03:28, 21 June 2023
This is an illustration of a basic alias.
With this alias, when a user enters 'sh', the system will instead transmit the command 'say hello world!'.
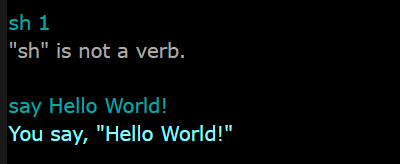
Please note, if you add any text after this alias, it won't work. For example, in the example above the user entered, "sh 1". This will not trigger the alias.
By selecting "Include prefix and suffix", you can include extra text along with your command to the game.
Example output:
Keep in mind that this alias is set using the 'Begins with' matching type. This allows you to type additional text following the primary shortcut, which will be attached to the original command. You can view the result in the picture provided below.
Important Links
Nexus 3.0 Documentation
The following links describe how to use the Nexus Client.
The Basics
- Nexus Account
- Game Selection
- Character Management
- The Game Client
- Windows and Tabs
- Keys, Gauges, Avatars
- General Functions
Client Settings
- Display Options
- Colors
- Buttons
- Reflex Packages
- Reflexes
- Variables
- Custom Tabs
- Gauges
- Advanced
- Feedback
- Help


