Mudlet To Nexus
From Iron Realms Nexus Client Documentation
The Nexus client supports many of the same features that the popular Mudlet client supports. Mudlet uses the LUA language to manipulate, create and execute scripts whereas the Nexus client uses JavaScript and client embedded functions to manipulate, create and execute scripts. This documentation is intended to show side by side comparisons between the popular Mudlet client and the IRE specific Nexus client.
While there will be visual references and comparisons between the two client UI's, this documentation is intended to show the comparison of scripting and not be a full user interface guide. For more help and an introduction on how to add, edit and remove these scripts in the Nexus client please refer to the BasicScripting and ClientBasics sections.
Basic Comparisons
Aliases
Aliases are shortcuts you can create for more complicated commands in the game. Aliases are commonly used for combat. For example I may create an alias that will send the command 'consecrate ground with holysymbol' by just typing in 'cg'. The aliases below are going to show the more advanced features of each client, and help you navigate how LUA translates to JavaScript. A majority of aliases can be made using the drop down action menus in the action portion of the reflexes window. A detailed explanation of how to do this can be found in the Aliases section of this wiki.
When you start getting in to how to customize and maximize an alias, you enter the realm of coding or scripting. Below will have a very quick explanation of how each feature is created, and then move on to several in-depth examples that require more usage of each clients more powerful features (either LUA or JavaScript scripting).
Creating an Alias
Creating an alias in Mudlet: Enter the scripting library, use the left-hand navigation buttons to select "Aliases", then select the "Add Item" button.
Creating an alias in Nexus: Select the settings button in the lower right hand corner of the client, navigate to the "Reflexes" tab, click the "+Add" button, select "Add an Alias" from the drop-down menu. (Aliases)
Scripting Examples
A detailed explanation of the Nexus client matching and action options can be found in the BasicScripting section under Aliases. For the purpose of this Mudlet to Nexus section, we will be comparing specific situations as opposed to giving definitions of the options in both clients. Each of these situations will require using advanced features of the Mudlet and Nexus clients.
Advanced Target Matching
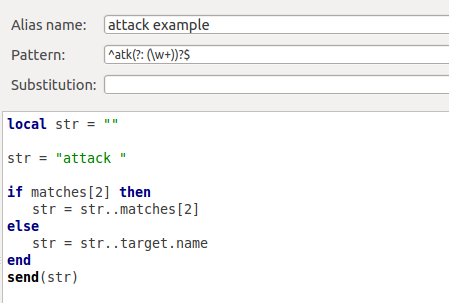
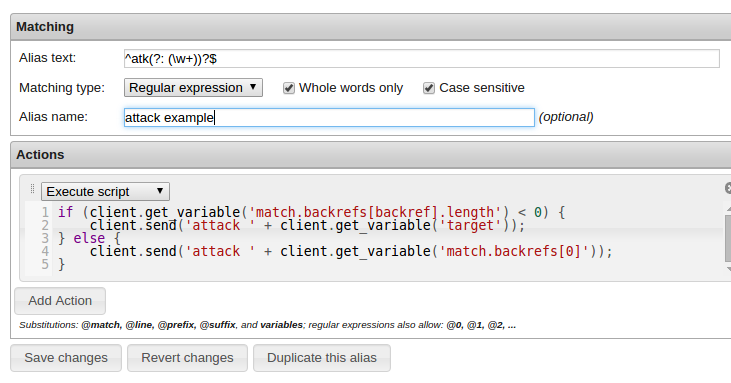
In this example we are going to examine an alias that will ATTACK either my target or a matched name that follows my alias text. This example involves checking against a variable, using logic to decide on an action, then sending that command back to the server. We are going to view an image of both completed aliases, then discuss each one.
Completed Scripts: Side by Side Comparison
Completed Scripts: Compare and Contrast
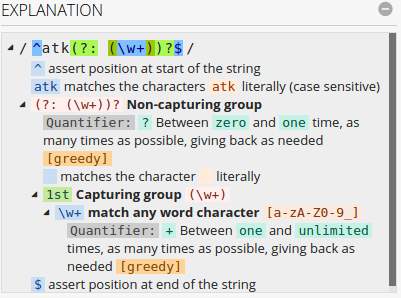
The first thing to note is that both scripts are using a regular expression to find a matched text. There is no difference in how a regular expression is evaluated other than how their matches are indexed.
As an example to how the regular expression is being evaluated, lets pretend we added this alias to our set of reflexes then went hunting and entered ATK ANIMAL as our input.
The LUA scripting engine behind mudlet is going to store the matches of our regular expression as an array called MATCH, from there we call the matches by index by using MATCHES[2] MATCHES[3] and so on. Notice that we start at MATCHES[2], as MATCHES[1] is going to take the entire line.
In the Nexus JS engine, we have exactly the same matching process. In Nexus the matches are stored as native variables called @1, @2, @3 and so on. Whereas in Mudlet, MATCHES[1] is the entire line, Nexus renames an entire line match simply as @line.
While we can use client.get_variable('@1') and so on while within the advanced scripting and function features of the Nexus JS client, it is important to point out that @1, @2, @suffix, @prefix, so on are all renamed for convenience and ease of use from the original native variables of match.match, match.line, match.suffix, match.prefix, and if it's a regex string, match.backrefs[0]. match.backrefs[1], match.backrefs[2] and so on. In our visual example above we specifically used our native un-renamed variable to show you that either will work. It's important to note however that if you are using logic to organize regular expressions or test against an undefined or null type, using the original match.backrefs seems to have more consistency. This is a rare case, but worth mentioning.


