Aliases: Difference between revisions
From Iron Realms Nexus Client Documentation
| Line 26: | Line 26: | ||
[[File:alias-options.png]] | [[File:alias-options.png]] | ||
==== Matching Options ==== | |||
==== Action Options ==== | |||
Once you have matched a command, you will want to send an action back. | |||
[[File:trigger-actions.png]] | |||
There are eight different action options. | |||
===== Send a command ===== | |||
This is the most basic and commonly used action. The alias will send the text to the game. | |||
[[File:action-send.png]] | |||
===== Show a notice ===== | |||
The action will display text using the set colors. It does not actually send any commands to the game. | |||
[[File:action-notice.png]] | |||
===== Wait ===== | |||
The wait action is usually used in conjunction with other actions. In the example below, we wait 3 seconds and then attack the rat. | |||
[[File:action-wait.png]] | |||
===== Call function ===== | |||
Functions are created with javascript and then called when the alias is typed into the game. You can read more about functions here: [[Functions]]. | |||
[[File:action-function.png]] | |||
===== Execute Script ===== | |||
Scripts are just like functions, but you write them in the box provided. You can read more about writing scripts and functions here: [[Functions]]. | |||
[[File:action-script.png]] | |||
Revision as of 17:56, 8 July 2015
How to Create a New Alias
Aliases are shortcuts you can create for more complicated commands in the game. Aliases are commonly used for combat. For example I may create a alias that will send the command 'consecrate ground with holysymbol' by just typing in 'cg'.
On this page we will demonstrate how to create a new alias.
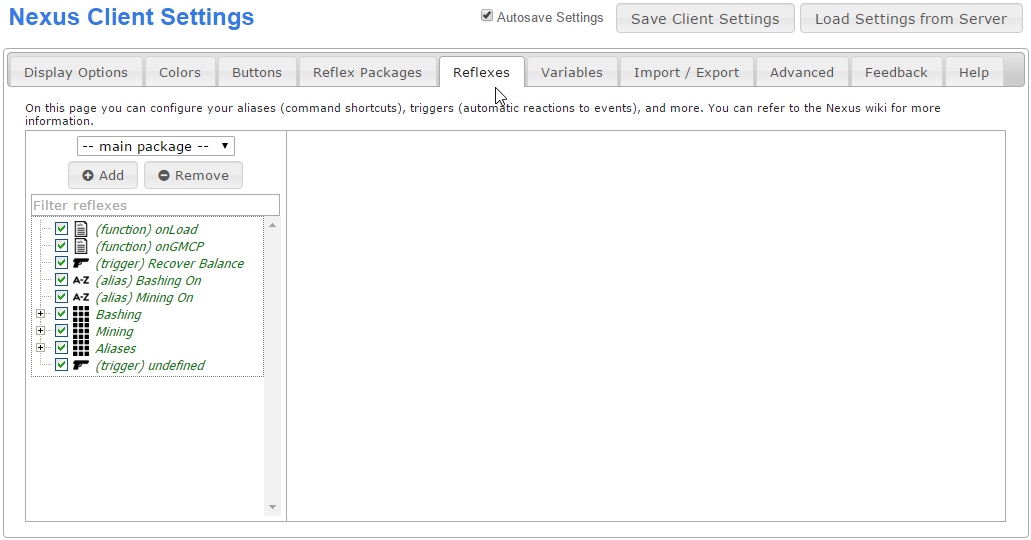
Step 1. Open the settings page and click the 'Reflexes' tab.
Reflexes is a term for all of the settings used to automate the game experience. In order to create a new alias you must first click on the 'Reflexes' tab as shown in the image below.
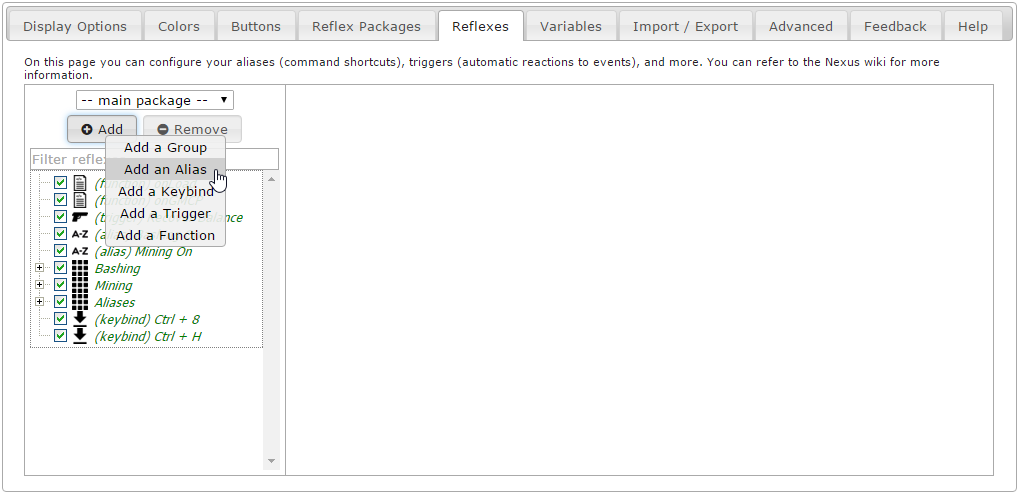
Step 2. Click the 'Add' Button and select 'Add an Alias'.
There are several different reflexes you can create. We want to create an alias. In order to do this, click the 'Add' button located in the left pane and then click on 'Add an Alias'. This will create a new, undefined alias.
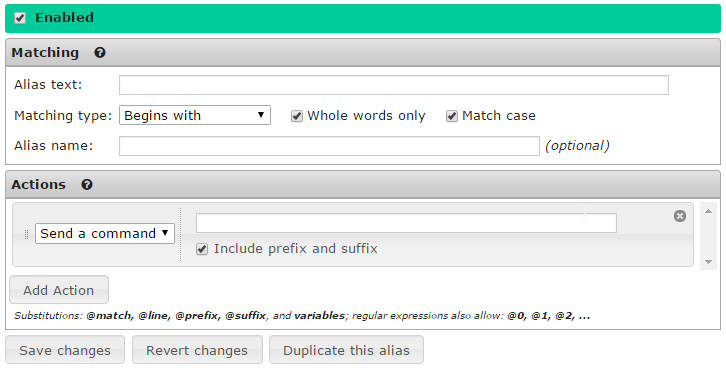
Step 3. Options for Aliases.
There are two parts to an alias; Matching and Actions.
Matching is based on what you type into the game. Usually this is a shorter version of a longer command. For example I may use 'arl' for 'apply restoration to legs'.
Actions are what happens when the command is entered into the game. In the example above, 'apply restoration to legs' would be sent to the game when you type in 'arl'.
Matching Options
Action Options
Once you have matched a command, you will want to send an action back.
There are eight different action options.
Send a command
This is the most basic and commonly used action. The alias will send the text to the game.
Show a notice
The action will display text using the set colors. It does not actually send any commands to the game.
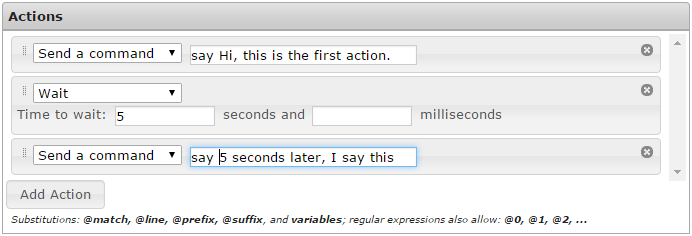
Wait
The wait action is usually used in conjunction with other actions. In the example below, we wait 3 seconds and then attack the rat.
Call function
Functions are created with javascript and then called when the alias is typed into the game. You can read more about functions here: Functions.
Execute Script
Scripts are just like functions, but you write them in the box provided. You can read more about writing scripts and functions here: Functions.


