Groups: Difference between revisions
From Iron Realms Nexus Client Documentation
No edit summary |
|||
| (2 intermediate revisions by the same user not shown) | |||
| Line 1: | Line 1: | ||
Groups | Groups can be used to easily organize your various reflexes into logical groups. Once you have created a group, you can use drag and drop to move the desired reflexes into it. Alternatively, you can select the group before creating the reflex, and it will be automatically added to the chosen group. | ||
Groups themselves can contain subgroups, creating a whole hierarchy of reflexes and allowing you organize your settings as you see fit. | |||
Disabling a group disables everything contained within it (including nested groups). This lets you easily enable and disable entire portions of your scripts to suit your needs. | |||
It is also possible to enable and disable groups programmatically - this is explained further below. | |||
=== Step 1. Open the settings page and click the 'Reflexes' tab. === | === Step 1. Open the settings page and click the 'Reflexes' tab. === | ||
| Line 22: | Line 28: | ||
[[File:group-dragged.png]] | [[File:group-dragged.png]] | ||
== Disabling and Enabling Groups with Scripts == | |||
The most useful option that this function provides is the ability to enable and disable various types of reflexes (including groups) in a script. | |||
To do this, you can use the client.reflex_enable and client.reflex_disable functions. | |||
For example: var el = client.reflex_find_by_name('group', 'Bashing'); client.reflex_disable(el);. | |||
You can use el.enabled in conditions to check if a particular reflex is enabled. | |||
[[Disable Group Alias]]: This is an example alias that will disable an entire group or reflexes. | |||
Latest revision as of 19:47, 8 July 2015
Groups can be used to easily organize your various reflexes into logical groups. Once you have created a group, you can use drag and drop to move the desired reflexes into it. Alternatively, you can select the group before creating the reflex, and it will be automatically added to the chosen group.
Groups themselves can contain subgroups, creating a whole hierarchy of reflexes and allowing you organize your settings as you see fit.
Disabling a group disables everything contained within it (including nested groups). This lets you easily enable and disable entire portions of your scripts to suit your needs.
It is also possible to enable and disable groups programmatically - this is explained further below.
Step 1. Open the settings page and click the 'Reflexes' tab.
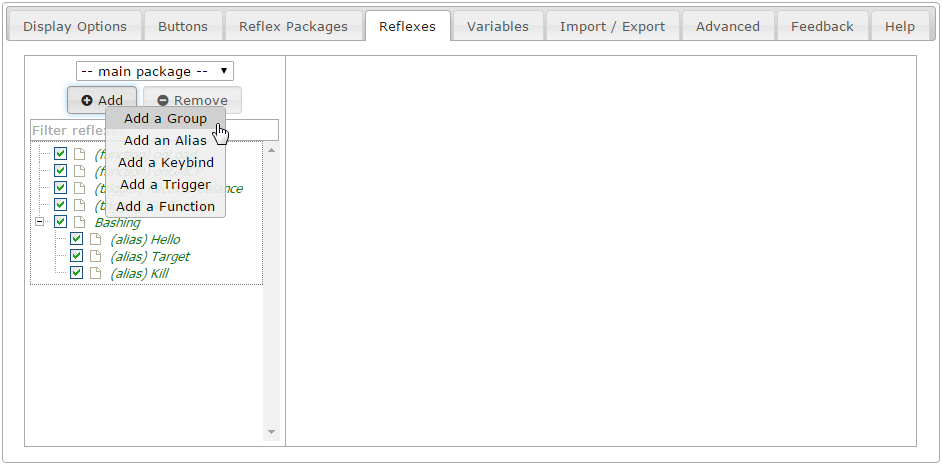
Reflexes is a term for all of the settings used to automate the game experience. In order to create a new reflex group you must click on the 'Reflexes' tab as shown in the image below.
Step 2. Click the 'Add' Button and select 'Add a Group'.
There are several different reflexes you can create. We want to create a group to organize them. In order to do this, click the 'Add' button located in the left pane and then click on 'Add a Group'.
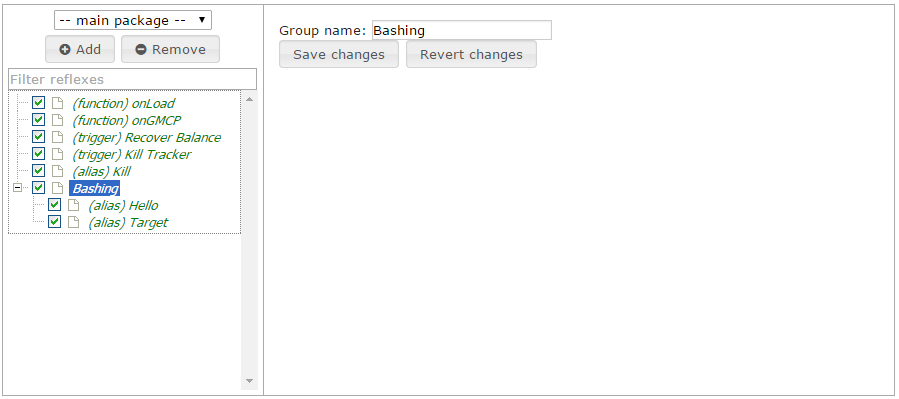
Once you have created a new group you can give it a name. In this example we are naming it Bashing.
Step 3. Drag your Reflexes into a Group
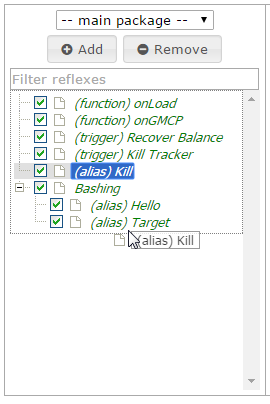
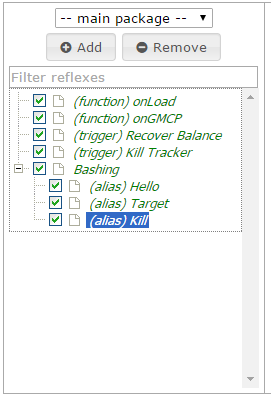
You can now drag and move your reflexes into the group. In the example below, we move the 'Kill' alias into the 'Bashing' group.
Disabling and Enabling Groups with Scripts
The most useful option that this function provides is the ability to enable and disable various types of reflexes (including groups) in a script.
To do this, you can use the client.reflex_enable and client.reflex_disable functions.
For example: var el = client.reflex_find_by_name('group', 'Bashing'); client.reflex_disable(el);.
You can use el.enabled in conditions to check if a particular reflex is enabled.
Disable Group Alias: This is an example alias that will disable an entire group or reflexes.


