Simplified Scripting: Difference between revisions
From Iron Realms Nexus Client Documentation
No edit summary |
(2.10 updates) |
||
| (39 intermediate revisions by 4 users not shown) | |||
| Line 1: | Line 1: | ||
Simplified Scripting in Nexus allows users to create complex [[triggers]], [[aliases]], and [[keybinds]] using a user interface. Previously this could only be accomplished with [[AdvancedScripting|advanced scripting]] options. | Simplified Scripting in Nexus allows users to create complex [[triggers]], [[aliases]], [[events]] and [[keybinds]] using a simple user interface. Previously this could only be accomplished with [[AdvancedScripting|advanced scripting]] options, which involves needing to know some amount of javascript. | ||
There are 15 different actions you can use. | |||
There are 15 different actions you can use. Hide the line, Highlight and Rewrite cannot be used for aliases and keybinds, however. | |||
== Send a command == | == Send a command == | ||
This is the most basic and commonly used action. The trigger will automatically send text back to the game. | This is the most basic and commonly used action. The trigger will automatically send text back to the game. In this example, the action will send ''attack rat'' when called. | ||
[[File:action-send.png]] | [[File:action-send.png]] | ||
== Show a notice == | == Show a notice == | ||
The action will just display a notice using whatever colors you choose. Typically players use these to get something to pop out at them so they know it has happened, but they may not want to automatically respond. | The action will just display a notice using whatever colors you choose. Typically players use these to get something to pop out at them so they know it has happened, but they may not want to automatically respond. In the example below, the game will display a bright red '''HIT HIM AGAIN''' when called. | ||
[[File:action-notice.png]] | [[File:action-notice.png]] | ||
== Desktop Notification == | |||
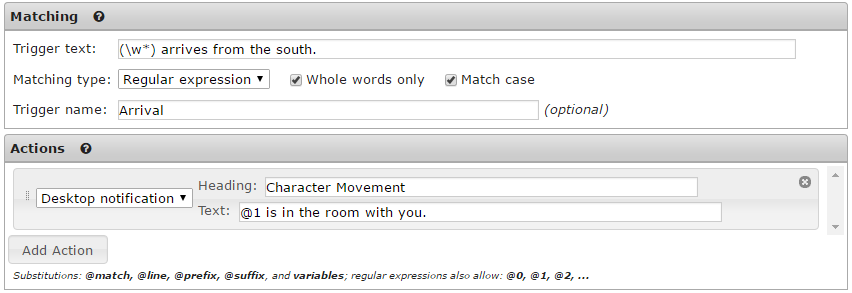
The action is used to display a desktop notification when a trigger has fired. In the example below, we have created a trigger that will display a desktop notification when someone has entered the room with you. | |||
[[File:action-notification.png]] | |||
Here is an example of the notification that will appear. | |||
[[File:action-notification-popup.png]] | |||
== Play a sound == | |||
This action will allow you to play a sound when an event is triggered. In the example below, an alarm will sound whenever another player enters the room. | |||
[[File:action-sound.png]] | |||
== Wait == | == Wait == | ||
| Line 20: | Line 33: | ||
[[File:action-wait.png]] | [[File:action-wait.png]] | ||
== Wait for == | == Wait for == | ||
This action is essentially a temporary trigger. It allows you to specify a line or pattern to wait for. Once encountered, the script will continue executing normally. If not encountered within the specified timeout, the script is aborted. | This action is essentially a temporary trigger. It allows you to specify a line or pattern to wait for. Once encountered, the script will continue executing normally. If not encountered within the specified timeout, the script is aborted. | ||
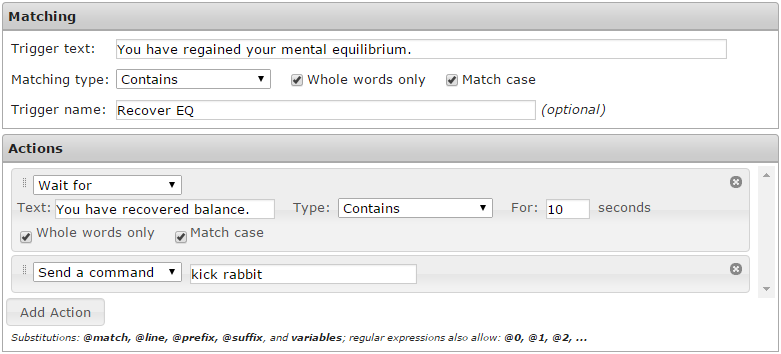
In the example below we have created a simple trigger that will fire when the client receives the text 'You have regained your mental equilibrium.'. The first action will then cause the trigger to wait 10 seconds, looking to receive the text from the game, 'You have recovered balance.'. | |||
If the trigger receives that text within 10 seconds, it will send the next action, which is set to send the command 'kick rabbit'. | |||
[[File:action-wait-for.png]] | |||
== Hide the line == | == Hide the line (or Gagging) == | ||
You can also opt to just hide any line that matches | You can also opt to just hide any line that matches your trigger. Sometimes this is good for text that you see over and over again and are tired of reading. | ||
This is also | This is also referred to as a gag or gagging. | ||
[[File:action-hide.png]] | [[File:action-hide.png]] | ||
== Highlight == | == Highlight == | ||
| Line 38: | Line 54: | ||
[[File:action-highlight.png]] | [[File:action-highlight.png]] | ||
== Rewrite == | == Rewrite == | ||
A rewrite will change the trigger text into whatever your would like. Players will typically use this to shorten long messages in combat. | A rewrite will change the trigger text into whatever your would like. Players will typically use this to shorten long messages in combat. | ||
In the case below we are rewriting the text in the trigger to display a bright yellow, ''Balance back''. | |||
[[File:action-rewrite.png]] | [[File:action-rewrite.png]] | ||
== Linkify == | |||
Linkify is similar to rewrite, and will change the trigger text into whatever your would like it to say. In addition it will make the text a clickable link, which can do whatever the user wants. | |||
In the case below we are rewriting the text in the trigger to display the text 'Need to wake up!' and making it a link that will issue the command to 'wake'. | |||
[[File:action-linkify.png]] | |||
== Modify variable == | == Modify variable == | ||
The modify variable action is used to modify a certain variable | The modify variable action is used to modify a certain variable. You can set it to a value, increase or decrease its value, assign the value of another variable to it, or modify it by the value of another variable. You can also assign the matched text or a captured part of it. It is a fairly flexible action. | ||
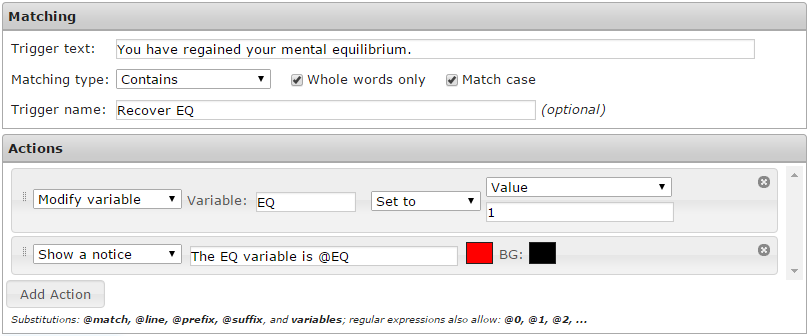
In the example below we have created a trigger that will set the @EQ variable to a value of 1 when your character has regained mental equilibrium. In the example we also display the value of the @EQ variable so that we can make sure it is correctly set. This is probably very redundant, but is a simple example. | |||
[[File:action-modify-variable.png]] | |||
== If == | == If == | ||
This | This is one of the more powerful actions for reflexes. It will allow your reflexes to execute actions based on if certain conditions are true or not. | ||
For example, you can compare two variables, or a variable and a fixed value. You can also compare against the matched text or a captured part of it. When the check succeeds or fails, you can choose whether the reflex should continue running normally, stop, or continue running from a Label action. | |||
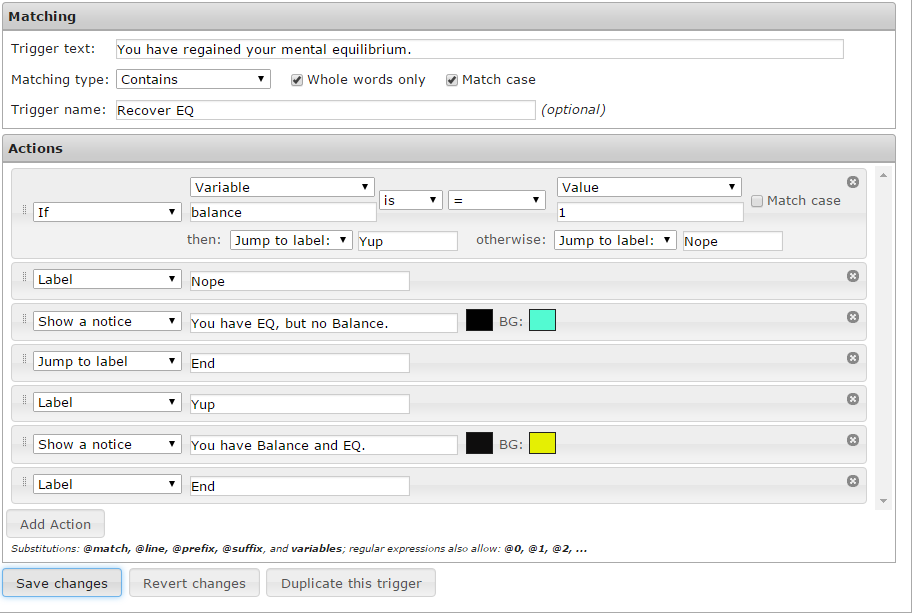
The example below is very simple. When a character recovers equilibrium it will check to see if the balance variable has been set to 1. The balance variable has been set to 1 or 0 from another reflex. | |||
If the balance variable is 1, it will jump to the 'Yup' label and then show a notice that the character has both Balance and EQ. | |||
If the balance variable is 0, it will jump to the 'Nope' label and show a notice that the character does not have Balance. It will then jump to the 'End' label. | |||
If it did not just to the 'End' label it would also do the Yup label action and the 'You have Balance and EQ.' notice. | |||
[[File:Action-if.png]] | |||
== Repeat == | == Repeat == | ||
This action allows you to repeat a block of actions multiple times. All actions up to a label that you specify will be repeated. | This action allows you to repeat a block of actions multiple times. All actions up to a label that you specify will be repeated. | ||
[[File:Action-repeat.png]] | |||
== Label == | == Label == | ||
This action does nothing at all. It is used together with the If, Repeat, and | This action does nothing at all. It is used together with the If, Repeat, and Jump to Label actions to do conditional execution and looping. | ||
[[File:Action-label.png]] | |||
== Jump to Label == | == Jump to Label == | ||
This action causes a jump to the label of your choice. It is best used inside an If or Repeat block, so you don't create an endless loop (the client does offer protection against these). | This action causes a jump to the label of your choice. It is best used inside an If or Repeat block, so you don't create an endless loop (the client does offer protection against these). | ||
The example below is absurd, but shows exactly how it functions. In this case the first action jumps right to the third action. Missing the second action completely. | |||
[[File:Action-jump.png]] | |||
== Disable this reflex == | == Disable this reflex == | ||
This simple action disables the current reflex. | This simple action disables the current reflex. This is useful when creating reflexes that should only work once. | ||
[[File:Action-disable.png]] | |||
== Disable reflex == | == Disable reflex == | ||
This action disables a reflex of your choice. The reflex must have a name. | This action disables a reflex of your choice. The reflex must have a name. It can also disable entire groups of reflexes. In the example below we are disabling a group that contains all of our bashing reflexes. | ||
[[File:Action-disable-reflex.png]] | |||
== Enable reflex == | == Enable reflex == | ||
This action enables a reflex of your choice. The reflex must have a name. | This action enables a reflex of your choice. The reflex must have a name. It can also enable entire groups of reflexes. In the example below we are enabling a group that contains all of our bashing reflexes. | ||
[[File:Action-enable-reflex.png]] | |||
== Stop == | |||
This action will stop all actions after this point. Useful for testing and for use in IF actions. | |||
[[File:Action-stop.png]] | |||
== Modify a button == | |||
This action will allow you to modify any of the client's buttons. Options you can set here are: | |||
* Change label - Change the text on the button | |||
* Change command - Change the command sent to the game when the button is pressed | |||
* Highlight - Set a button to be highlighted | |||
* Unhighlight - Set a button to not be highlighted | |||
* Reset to default - Set a button back to the default. | |||
[[File:action_buttons.png]] | |||
Latest revision as of 17:14, 18 March 2018
Simplified Scripting in Nexus allows users to create complex triggers, aliases, events and keybinds using a simple user interface. Previously this could only be accomplished with advanced scripting options, which involves needing to know some amount of javascript.
There are 15 different actions you can use. Hide the line, Highlight and Rewrite cannot be used for aliases and keybinds, however.
Send a command
This is the most basic and commonly used action. The trigger will automatically send text back to the game. In this example, the action will send attack rat when called.
Show a notice
The action will just display a notice using whatever colors you choose. Typically players use these to get something to pop out at them so they know it has happened, but they may not want to automatically respond. In the example below, the game will display a bright red HIT HIM AGAIN when called.
Desktop Notification
The action is used to display a desktop notification when a trigger has fired. In the example below, we have created a trigger that will display a desktop notification when someone has entered the room with you.
Here is an example of the notification that will appear.
Play a sound
This action will allow you to play a sound when an event is triggered. In the example below, an alarm will sound whenever another player enters the room.
Wait
The wait action is usually used in conjunction with other actions. In the example below, we wait 3 seconds and then attack the rat.
Wait for
This action is essentially a temporary trigger. It allows you to specify a line or pattern to wait for. Once encountered, the script will continue executing normally. If not encountered within the specified timeout, the script is aborted.
In the example below we have created a simple trigger that will fire when the client receives the text 'You have regained your mental equilibrium.'. The first action will then cause the trigger to wait 10 seconds, looking to receive the text from the game, 'You have recovered balance.'.
If the trigger receives that text within 10 seconds, it will send the next action, which is set to send the command 'kick rabbit'.
Hide the line (or Gagging)
You can also opt to just hide any line that matches your trigger. Sometimes this is good for text that you see over and over again and are tired of reading.
This is also referred to as a gag or gagging.
Highlight
This will highlight the text you have matched. There are more options here to highlight the text around the trigger as well.
Rewrite
A rewrite will change the trigger text into whatever your would like. Players will typically use this to shorten long messages in combat.
In the case below we are rewriting the text in the trigger to display a bright yellow, Balance back.
Linkify
Linkify is similar to rewrite, and will change the trigger text into whatever your would like it to say. In addition it will make the text a clickable link, which can do whatever the user wants.
In the case below we are rewriting the text in the trigger to display the text 'Need to wake up!' and making it a link that will issue the command to 'wake'.
Modify variable
The modify variable action is used to modify a certain variable. You can set it to a value, increase or decrease its value, assign the value of another variable to it, or modify it by the value of another variable. You can also assign the matched text or a captured part of it. It is a fairly flexible action.
In the example below we have created a trigger that will set the @EQ variable to a value of 1 when your character has regained mental equilibrium. In the example we also display the value of the @EQ variable so that we can make sure it is correctly set. This is probably very redundant, but is a simple example.
If
This is one of the more powerful actions for reflexes. It will allow your reflexes to execute actions based on if certain conditions are true or not.
For example, you can compare two variables, or a variable and a fixed value. You can also compare against the matched text or a captured part of it. When the check succeeds or fails, you can choose whether the reflex should continue running normally, stop, or continue running from a Label action.
The example below is very simple. When a character recovers equilibrium it will check to see if the balance variable has been set to 1. The balance variable has been set to 1 or 0 from another reflex.
If the balance variable is 1, it will jump to the 'Yup' label and then show a notice that the character has both Balance and EQ.
If the balance variable is 0, it will jump to the 'Nope' label and show a notice that the character does not have Balance. It will then jump to the 'End' label.
If it did not just to the 'End' label it would also do the Yup label action and the 'You have Balance and EQ.' notice.
Repeat
This action allows you to repeat a block of actions multiple times. All actions up to a label that you specify will be repeated.
Label
This action does nothing at all. It is used together with the If, Repeat, and Jump to Label actions to do conditional execution and looping.
Jump to Label
This action causes a jump to the label of your choice. It is best used inside an If or Repeat block, so you don't create an endless loop (the client does offer protection against these).
The example below is absurd, but shows exactly how it functions. In this case the first action jumps right to the third action. Missing the second action completely.
Disable this reflex
This simple action disables the current reflex. This is useful when creating reflexes that should only work once.
Disable reflex
This action disables a reflex of your choice. The reflex must have a name. It can also disable entire groups of reflexes. In the example below we are disabling a group that contains all of our bashing reflexes.
Enable reflex
This action enables a reflex of your choice. The reflex must have a name. It can also enable entire groups of reflexes. In the example below we are enabling a group that contains all of our bashing reflexes.
Stop
This action will stop all actions after this point. Useful for testing and for use in IF actions.
Modify a button
This action will allow you to modify any of the client's buttons. Options you can set here are:
- Change label - Change the text on the button
- Change command - Change the command sent to the game when the button is pressed
- Highlight - Set a button to be highlighted
- Unhighlight - Set a button to not be highlighted
- Reset to default - Set a button back to the default.


