Keybinds: Difference between revisions
From Iron Realms Nexus Client Documentation
| (3 intermediate revisions by the same user not shown) | |||
| Line 4: | Line 4: | ||
* Use the numberpad for movement (North, East, Southwest, etc). | * Use the numberpad for movement (North, East, Southwest, etc). | ||
* Press | * Press CTRL+H to drink a health vial. | ||
* Press | * Press ALT+UP to Dash North or Glance North. | ||
* Press F12 to yell for help when getting attacked. | * Press F12 to yell for help when getting attacked. | ||
| Line 11: | Line 11: | ||
== How to Create a New Keybind == | == How to Create a New Keybind == | ||
Keybindings are a reflex. They are created and managed from the Reflexes tab in the settings window. To open the settings window, click on the gear icon [[File:Settings_icon.jpg|text-bottom]] in the lower right part of your main game screen | Keybindings are a reflex. They are created and managed from the Reflexes tab in the settings window. To open the settings window, click on the gear icon [[File:Settings_icon.jpg|text-bottom]] in the lower right part of your main game screen | ||
=== Step 1. Open the settings page and click the 'Reflexes' tab. === | === Step 1. Open the settings page and click the 'Reflexes' tab. === | ||
To create a new keybind, open your settings window by clicking on the gear icon [[File:Settings_icon.jpg|text-bottom]] in the lower right part of your game screen. This will popup a new window in your brower. | To create a new keybind, open your settings window by clicking on the gear icon [[File:Settings_icon.jpg|text-bottom]] in the lower right part of your game screen. This will popup a new window in your brower. | ||
| Line 23: | Line 21: | ||
=== Step 2. Click the 'Add' Button and select 'Add a Keybind'. === | === Step 2. Click the 'Add' Button and select 'Add a Keybind'. === | ||
There are several different reflexes you can create. We want to create a keybind. In order to do this, click the 'Add' button located in the left pane and then click on 'Add a Keybind'. This will create a new, undefined keybind. | There are several different reflexes you can create. We want to create a keybind. In order to do this, click the 'Add' button located in the left pane and then click on 'Add a Keybind'. This will create a new, undefined keybind. | ||
| Line 32: | Line 29: | ||
=== Step 3: Keybind Options === | === Step 3: Keybind Options === | ||
There are | There are three main options for keybinds; '''Enabled''', '''Key Shortcut''' and '''Actions'''. | ||
'''Enabled''' This checkbox marks if the keybind is currently being used by the system. If unchecked, this keybind will not be used. | |||
'''Key Shortcut''' is used to assign the key or keys for this keybind. | '''Key Shortcut''' is used to assign the key or keys for this keybind. | ||
| Line 41: | Line 40: | ||
== Key Shortcut Explained == | == Key Shortcut Explained == | ||
All keybindings are tied to a single key, or combination of keys. For example, I could assign keybind to the F10 key, or a combination of ALT+F10 or even CTRL+ALT+F10. Almost any combination of keys can be used unless your browser is already using them for something else. | All keybindings are tied to a single key, or combination of keys. For example, I could assign keybind to the F10 key, or a combination of ALT+F10 or even CTRL+ALT+F10. Almost any combination of keys can be used unless your browser is already using them for something else. | ||
| Line 65: | Line 63: | ||
=== Simplified Scripting === | === Simplified Scripting === | ||
The Nexus client allows keybinds to use 13 different [[SimplifiedScripting|simplified scripting]] actions. In most cases instantly returning a command is the best option. However, the Nexus client will allow you to loop commands, use if statements, waits, and more. | The Nexus client allows keybinds to use 13 different [[SimplifiedScripting|simplified scripting]] actions. In most cases instantly returning a command is the best option. However, the Nexus client will allow you to loop commands, use if statements, waits, and more. | ||
| Line 71: | Line 68: | ||
=== Advanced Scripting === | === Advanced Scripting === | ||
There are two main [[AdvancedScripting|advanced scripting]] options. You can ''Call function'' or you can ''Execute script''. Both options allow for the use of javascript. You can learn more and [[functions]] here and more about [[javascript]] here. | There are two main [[AdvancedScripting|advanced scripting]] options. You can ''Call function'' or you can ''Execute script''. Both options allow for the use of javascript. You can learn more and [[functions]] here and more about [[javascript]] here. | ||
Latest revision as of 18:14, 15 September 2016
Keybinds or Keybindings are a way to tag certain a certain key or combination of keys to execute actions.
A few brief examples of keybindings:
- Use the numberpad for movement (North, East, Southwest, etc).
- Press CTRL+H to drink a health vial.
- Press ALT+UP to Dash North or Glance North.
- Press F12 to yell for help when getting attacked.
The basic usage of keybindings is similar to that of aliases or triggers. It can be used in conjunction with variables and they can be assigned to groups.
How to Create a New Keybind
Keybindings are a reflex. They are created and managed from the Reflexes tab in the settings window. To open the settings window, click on the gear icon ![]() in the lower right part of your main game screen
in the lower right part of your main game screen
Step 1. Open the settings page and click the 'Reflexes' tab.
To create a new keybind, open your settings window by clicking on the gear icon ![]() in the lower right part of your game screen. This will popup a new window in your brower.
in the lower right part of your game screen. This will popup a new window in your brower.
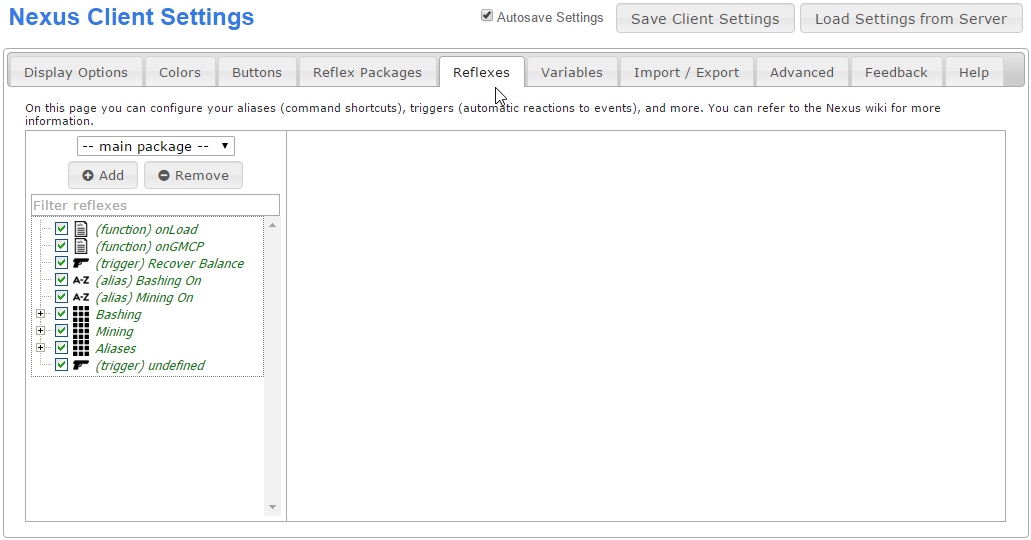
In the settings window, click on the 'Reflexes' tab as shown in the image below.

Step 2. Click the 'Add' Button and select 'Add a Keybind'.
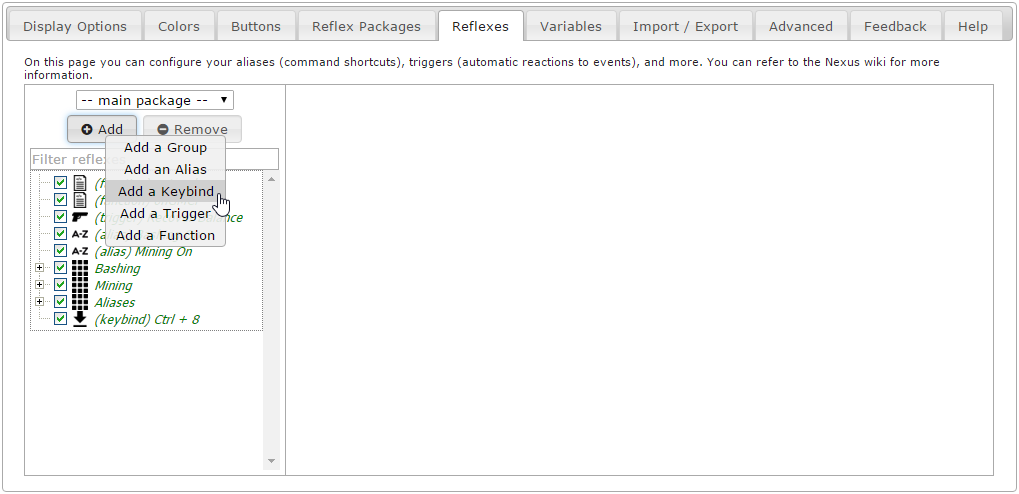
There are several different reflexes you can create. We want to create a keybind. In order to do this, click the 'Add' button located in the left pane and then click on 'Add a Keybind'. This will create a new, undefined keybind.
Should you want to delete a keybind, you can select the keybind from the list, and then click the 'Remove' button.

Step 3: Keybind Options
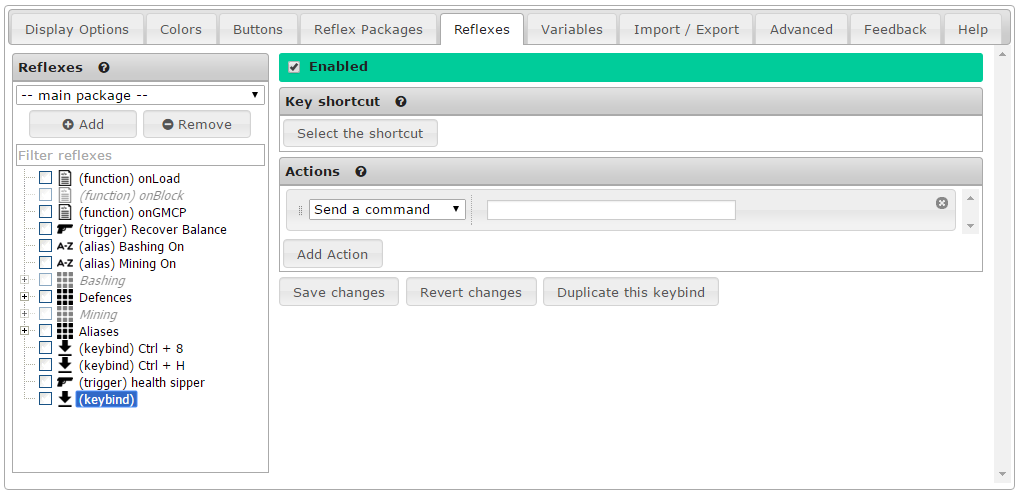
There are three main options for keybinds; Enabled, Key Shortcut and Actions.
Enabled This checkbox marks if the keybind is currently being used by the system. If unchecked, this keybind will not be used.
Key Shortcut is used to assign the key or keys for this keybind.
Actions is what will happen when press the key or combination of keys. Actions can be used to send commands to the game, set variables, turn on other reflexes, execute functions, and other things.

Key Shortcut Explained
All keybindings are tied to a single key, or combination of keys. For example, I could assign keybind to the F10 key, or a combination of ALT+F10 or even CTRL+ALT+F10. Almost any combination of keys can be used unless your browser is already using them for something else.
To assign a keybind, press the 'Select a shortcut' button.
When the 'Press the desired key combination...' appears press the keys you want to assign.
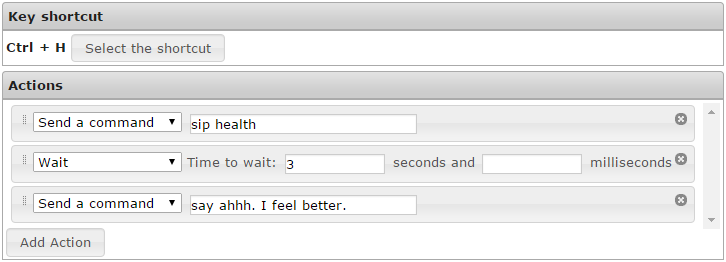
Once done, your keybind combination will be displayed. You can reassign it again at any time. In this example we have assigned it to a combination of the 'Ctrl' and letter 'h' keys.
Action Options Explained
Once you have assigned your key or keys, you can initiate a single action, or a series of multiple actions. Actions will fire in the order they are listed.
Above is a simple example of three separate actions that will occur when you press CTRL+H. In this case you will sip health, wait 3 seconds, and then say Ahhh, I feel better.
Simplified Scripting
The Nexus client allows keybinds to use 13 different simplified scripting actions. In most cases instantly returning a command is the best option. However, the Nexus client will allow you to loop commands, use if statements, waits, and more.
All of these options, with full explanations and examples can be found here: simplified scripting.
Advanced Scripting
There are two main advanced scripting options. You can Call function or you can Execute script. Both options allow for the use of javascript. You can learn more and functions here and more about javascript here.


