Aliases: Difference between revisions
From Iron Realms Nexus Client Documentation
| (24 intermediate revisions by 4 users not shown) | |||
| Line 1: | Line 1: | ||
Aliases are shortcuts you can create for more complicated commands in the game. Aliases are commonly used for combat. These commands can be combined with [[variables]] to create more powerful aliases. | |||
Some examples of aliases: | |||
* Type in dh to DRINK HEALTH | |||
* Type in t jeremy to set jeremy to be your target. | |||
* Override a command in the game you do not want to do on accident, like GIVE or QUIT. | |||
* An alias that will send the command 'consecrate ground with holysymbol' by just typing in 'cg' | |||
== How to Create a New Alias == | == How to Create a New Alias == | ||
Aliases are | Aliases are a reflex. They are created and managed from the Reflexes tab in the settings window. To open the settings window, click on the gear icon [[File:Settings_icon.jpg|text-bottom]] in the lower right part of your main game screen | ||
=== Step 1. Open the settings page and click the 'Reflexes' tab. === | === Step 1. Open the settings page and click the 'Reflexes' tab. === | ||
To create a new alias, open your settings window by clicking on the gear icon [[File:Settings_icon.jpg|text-bottom]] in the lower right part of your game screen. This will popup a new window in your browser. | |||
[[File:tab-reflexes.png]] | [[File:tab-reflexes.png]] | ||
| Line 17: | Line 23: | ||
[[File:alias-create.png]] | [[File:alias-create.png]] | ||
=== Step 3. Options | === Step 3. Aliases Options. === | ||
There are | There are three main options for aliases; '''Enabled''', '''Matching''' and '''Actions'''. | ||
'''Matching''' is | '''Enabled''' This checkbox marks if the alias is currently being used by the system. If unchecked, this alias will not be used. | ||
'''Matching''' is what command you would like to assign to your alias. Usually this is a shorter version of a longer command. For example I may use 'arl' for 'apply restoration to legs'. | |||
'''Actions''' are what happens when the command is entered into the game. In the example above, 'apply restoration to legs' would be sent to the game when you type in 'arl'. | '''Actions''' are what happens when the command is entered into the game. In the example above, 'apply restoration to legs' would be sent to the game when you type in 'arl'. | ||
| Line 27: | Line 35: | ||
[[File:alias-options.png]] | [[File:alias-options.png]] | ||
== Matching Options Explained == | |||
Matching is used for creating the command for the alias you are creating. There are five settings. | Matching is used for creating the command for the alias you are creating. There are five settings. | ||
| Line 34: | Line 41: | ||
[[File:alias-matching.png]] | [[File:alias-matching.png]] | ||
=== Alias Text === | |||
This field is required and contains the alias text. Anything can be used to create your alias. Typically they are very short and easy to remember. for example I may use the text 'sh' and later create an action that will do 'say hello world!'. | This field is required and contains the alias text. Anything can be used to create your alias. Typically they are very short and easy to remember. for example I may use the text 'sh' and later create an action that will do 'say hello world!'. | ||
| Line 40: | Line 47: | ||
This works hand in hand with the 'Matching Type' option. See below. | This works hand in hand with the 'Matching Type' option. See below. | ||
=== Whole Words Only === | |||
If checked, the alias will only match whole words. | If checked, the alias will only match whole words. | ||
| Line 52: | Line 59: | ||
In almost all cases you will just want to keep 'Whole words only' checked. Remember that whole words are separated by spaces and punctuation is considered part of a word. | In almost all cases you will just want to keep 'Whole words only' checked. Remember that whole words are separated by spaces and punctuation is considered part of a word. | ||
=== | === Match Case === | ||
If checked, capitalization must match. | If checked, capitalization must match. | ||
| Line 58: | Line 65: | ||
For example, if checked, 'sh' is not the same as 'SH'. | For example, if checked, 'sh' is not the same as 'SH'. | ||
=== Alias Name === | |||
(Optional) The name of the alias. The name is an identifier that will show up in your list of reflexes. It is not required for your alias and has nothing to do with the actual operation of the alias. | (Optional) The name of the alias. The name is an identifier that will show up in your list of reflexes. It is not required for your alias and has nothing to do with the actual operation of the alias. | ||
=== Matching Type === | |||
There are three options for matching text. | There are three options for matching text. | ||
* Begins with: Will only match | * Begins with: Will only match a command that starts with your alias text in it. | ||
* Exact match: Will only match an alias that matches | * Exact match: Will only match an alias that exactly matches your alias text. | ||
* Regular expression: This will match any regular expression patterns. This is advanced, but good to learn. See the examples below. | * Regular expression: This will match any 'regular expression' patterns. This is somewhat advanced, but good to learn. See the examples below. | ||
In most cases you will want to use 'Begins with' | In most cases you will want to use 'Begins with'. | ||
== Action Options Explained == | |||
Once you have | Once you have decided on the text for your alias, you can initiate a single action, or a series of multiple actions. Actions will fire in the order they are listed. | ||
[[File:trigger-actions.png]] | [[File:trigger-actions.png]] | ||
Above is a simple example of three separate actions that will happen when an alias is entered into the game. | |||
=== Simplified Scripting === | |||
The Nexus client allows for twelve different [[SimplifiedScripting|simplified scripting]] actions for use in aliases. In most cases instantly returning a command is the best option. However, the Nexus client will allow you to loop through commands, use if statements, wait commands, highlight text, and much more. | |||
All of these options, with full explanations and examples can be found here: [[SimplifiedScripting|simplified scripting]]. | |||
Below is an example of a simple alias which opens a door for you if one is in your way, while trying to move south. | |||
[[Image:SouthAlias.png|600px]] | |||
The first action chosen is the basic "send a command", which sends the text "south" to the game. This is just like typing south into the command line. | |||
This is the | Next, we have the "wait for" action, which creates a temporary trigger, waiting for the words "There is a door in the way.". If we get that message, then we send the next action which is, again, "send a command". In this case we send two commands, one to open the door, and another to move south. | ||
Another slightly more advanced option, would be if you wanted to override the basic SAY command to rotate between speech patterns. | |||
[[Image:Say1Alias.png|600px]] | |||
[[Image:Say2Alias.png|600px]] | |||
[[Image:Say3Alias.png|600px]] | |||
[[Image:Say4Alias.png|600px]] | |||
To explain this alias step by step. In the first "talk" alias, we set a local var called "talk_counter" which increments by 1 every time we talk. Based on the value of that var, we choose a different version of talking to send to the client. (Sloshing around), or (Waving his hands) for example. | |||
The labels tell the If blocks, where to go based on the value of "talk_counter". When we reach the final If result, instead of going to a label, the script simple continues to the next line. At this point, we set the value of talk_counter back to 0, so we can start the loop all over again. | |||
Also note, the use to the "Stop" command, to prevent the script from continuing after reaching the end of a specific label. | |||
As you might have surmised, this creates a problem if you try to "SAY TO" somebody. To fix this, we create a second alias which handles the "SAY TO" input. | |||
[[Image:SayToAlias.png|600px]] | |||
In this second alias, we set two local variables, and change the alias to "sayto", so that we can capture the specific case of talking to a person instead of talking in general. | |||
=== Advanced Scripting === | |||
There are two main [[AdvancedScripting|advanced scripting]] options. You can ''Call function'' or you can ''Execute script''. Both options allow for the use of javascript. You can learn more and [[functions]] here and more about [[javascript]] here. | |||
== Expansions == | |||
Aliases support expansions, which allow you to add on-the-spot modifications to the command you send to the game. | |||
For example, let's say you want to make an alias that picks up an item and puts it into your pack, called pp. To do this, you can simply make an alias with pp as the alias text, and two actions (use Add Action to add the second one), get @suffix and put @suffix in pack. The 'suffix' in this case is anything that comes after the alias in your command. | |||
[[ | For both actions, disable the include prefix and suffix option, and you are done. See [[Put Pack Alias]]. | ||
The available expansions are: | |||
* @match - the matched text | |||
* @suffix - anything coming after the matched text | |||
* @prefix - anything coming in front of the matched text; this only makes sense for regular expressions | |||
Tip: You can use @line to send the original command along with the aliased commands - this is useful if you want to perform additional actions when sending a particular command, instead of replacing it. | |||
Here is more information about [[expansions]]. | |||
== Examples == | == Examples == | ||
[[ | |||
Learn how to create more aliases on the [[examples]] page. | |||
Latest revision as of 18:13, 15 September 2016
Aliases are shortcuts you can create for more complicated commands in the game. Aliases are commonly used for combat. These commands can be combined with variables to create more powerful aliases.
Some examples of aliases:
- Type in dh to DRINK HEALTH
- Type in t jeremy to set jeremy to be your target.
- Override a command in the game you do not want to do on accident, like GIVE or QUIT.
- An alias that will send the command 'consecrate ground with holysymbol' by just typing in 'cg'
How to Create a New Alias
Aliases are a reflex. They are created and managed from the Reflexes tab in the settings window. To open the settings window, click on the gear icon ![]() in the lower right part of your main game screen
in the lower right part of your main game screen
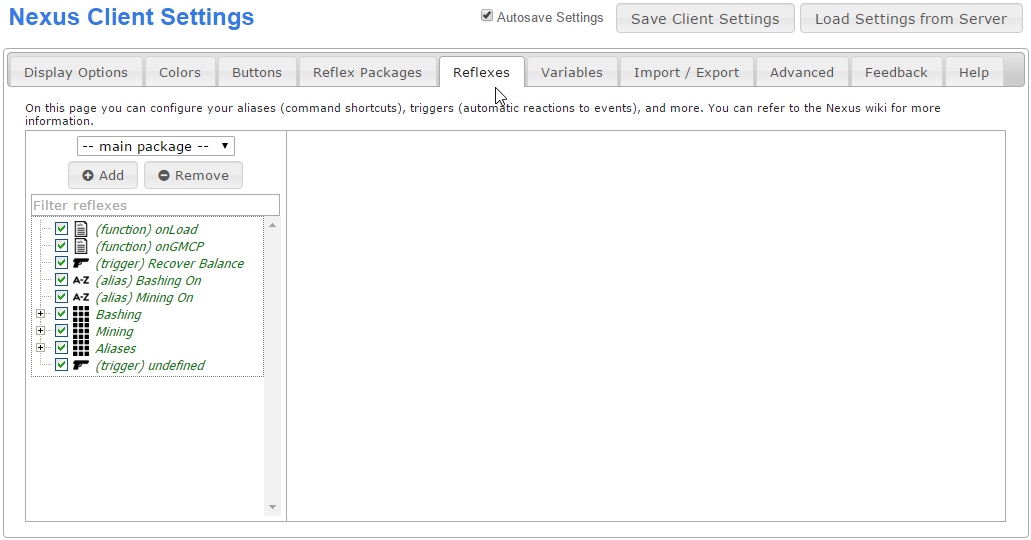
Step 1. Open the settings page and click the 'Reflexes' tab.
To create a new alias, open your settings window by clicking on the gear icon ![]() in the lower right part of your game screen. This will popup a new window in your browser.
in the lower right part of your game screen. This will popup a new window in your browser.
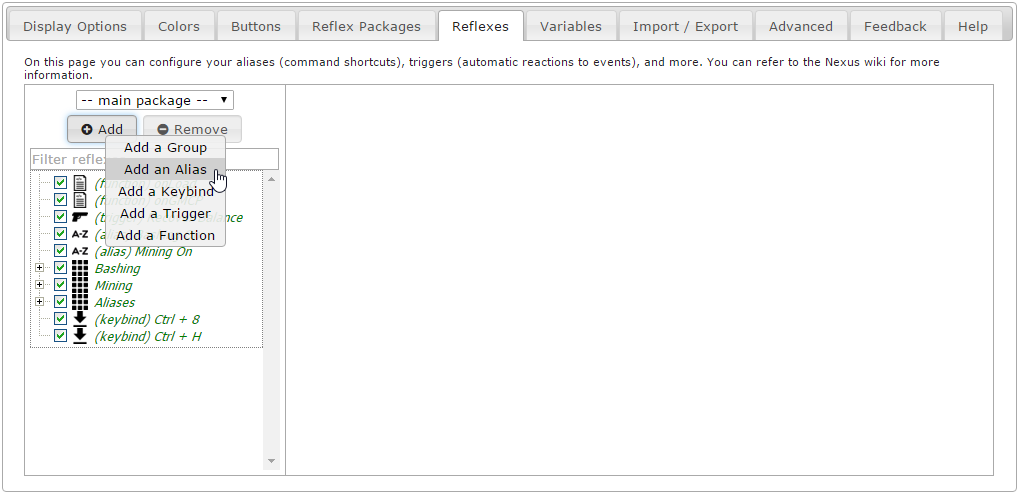
Step 2. Click the 'Add' Button and select 'Add an Alias'.
There are several different reflexes you can create. We want to create an alias. In order to do this, click the 'Add' button located in the left pane and then click on 'Add an Alias'. This will create a new, undefined alias.
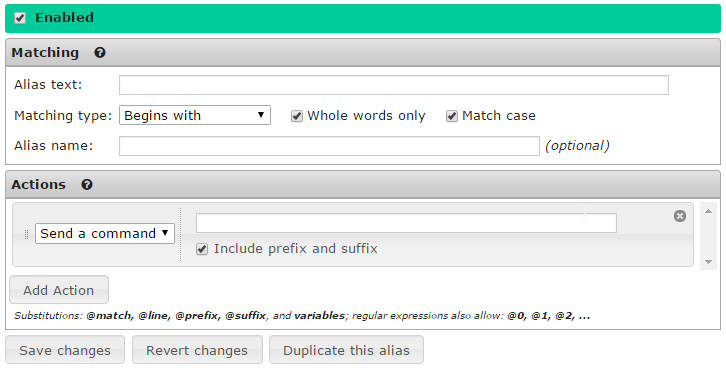
Step 3. Aliases Options.
There are three main options for aliases; Enabled, Matching and Actions.
Enabled This checkbox marks if the alias is currently being used by the system. If unchecked, this alias will not be used.
Matching is what command you would like to assign to your alias. Usually this is a shorter version of a longer command. For example I may use 'arl' for 'apply restoration to legs'.
Actions are what happens when the command is entered into the game. In the example above, 'apply restoration to legs' would be sent to the game when you type in 'arl'.
Matching Options Explained
Matching is used for creating the command for the alias you are creating. There are five settings.
Alias Text
This field is required and contains the alias text. Anything can be used to create your alias. Typically they are very short and easy to remember. for example I may use the text 'sh' and later create an action that will do 'say hello world!'.
This works hand in hand with the 'Matching Type' option. See below.
Whole Words Only
If checked, the alias will only match whole words.
For example, my alias text is 'sh'
In this case, if I type in 'sha' it will NOT match. However, 'sh a' WILL work.
If I uncheck 'Whole words only', then 'sha' will work.
In almost all cases you will just want to keep 'Whole words only' checked. Remember that whole words are separated by spaces and punctuation is considered part of a word.
Match Case
If checked, capitalization must match.
For example, if checked, 'sh' is not the same as 'SH'.
Alias Name
(Optional) The name of the alias. The name is an identifier that will show up in your list of reflexes. It is not required for your alias and has nothing to do with the actual operation of the alias.
Matching Type
There are three options for matching text.
- Begins with: Will only match a command that starts with your alias text in it.
- Exact match: Will only match an alias that exactly matches your alias text.
- Regular expression: This will match any 'regular expression' patterns. This is somewhat advanced, but good to learn. See the examples below.
In most cases you will want to use 'Begins with'.
Action Options Explained
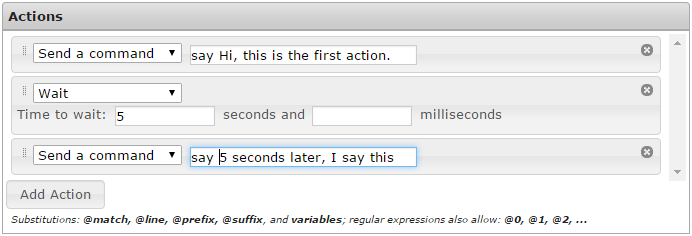
Once you have decided on the text for your alias, you can initiate a single action, or a series of multiple actions. Actions will fire in the order they are listed.
Above is a simple example of three separate actions that will happen when an alias is entered into the game.
Simplified Scripting
The Nexus client allows for twelve different simplified scripting actions for use in aliases. In most cases instantly returning a command is the best option. However, the Nexus client will allow you to loop through commands, use if statements, wait commands, highlight text, and much more.
All of these options, with full explanations and examples can be found here: simplified scripting.
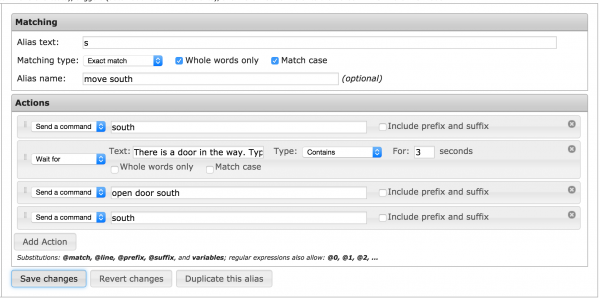
Below is an example of a simple alias which opens a door for you if one is in your way, while trying to move south.
The first action chosen is the basic "send a command", which sends the text "south" to the game. This is just like typing south into the command line. Next, we have the "wait for" action, which creates a temporary trigger, waiting for the words "There is a door in the way.". If we get that message, then we send the next action which is, again, "send a command". In this case we send two commands, one to open the door, and another to move south.
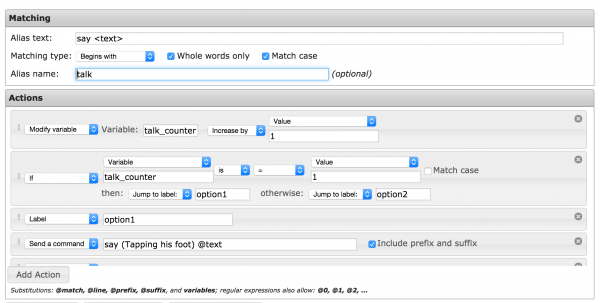
Another slightly more advanced option, would be if you wanted to override the basic SAY command to rotate between speech patterns.
To explain this alias step by step. In the first "talk" alias, we set a local var called "talk_counter" which increments by 1 every time we talk. Based on the value of that var, we choose a different version of talking to send to the client. (Sloshing around), or (Waving his hands) for example. The labels tell the If blocks, where to go based on the value of "talk_counter". When we reach the final If result, instead of going to a label, the script simple continues to the next line. At this point, we set the value of talk_counter back to 0, so we can start the loop all over again. Also note, the use to the "Stop" command, to prevent the script from continuing after reaching the end of a specific label.
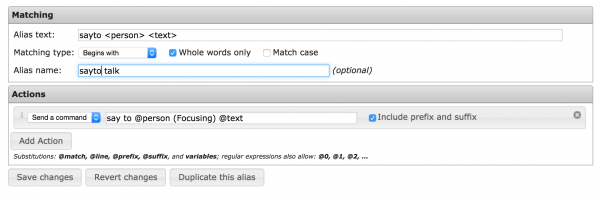
As you might have surmised, this creates a problem if you try to "SAY TO" somebody. To fix this, we create a second alias which handles the "SAY TO" input.
In this second alias, we set two local variables, and change the alias to "sayto", so that we can capture the specific case of talking to a person instead of talking in general.
Advanced Scripting
There are two main advanced scripting options. You can Call function or you can Execute script. Both options allow for the use of javascript. You can learn more and functions here and more about javascript here.
Expansions
Aliases support expansions, which allow you to add on-the-spot modifications to the command you send to the game.
For example, let's say you want to make an alias that picks up an item and puts it into your pack, called pp. To do this, you can simply make an alias with pp as the alias text, and two actions (use Add Action to add the second one), get @suffix and put @suffix in pack. The 'suffix' in this case is anything that comes after the alias in your command.
For both actions, disable the include prefix and suffix option, and you are done. See Put Pack Alias.
The available expansions are:
- @match - the matched text
- @suffix - anything coming after the matched text
- @prefix - anything coming in front of the matched text; this only makes sense for regular expressions
Tip: You can use @line to send the original command along with the aliased commands - this is useful if you want to perform additional actions when sending a particular command, instead of replacing it.
Here is more information about expansions.
Examples
Learn how to create more aliases on the examples page.
