Groups: Difference between revisions
From Iron Realms Nexus Client Documentation
(Created page with "File:group-create.png File:group-blank.png File:group-dragging.png File:group-dragged.png") |
No edit summary |
||
| Line 1: | Line 1: | ||
Groups are used to organize your reflexes. | |||
=== Step 1. Open the settings page and click the 'Reflexes' tab. === | |||
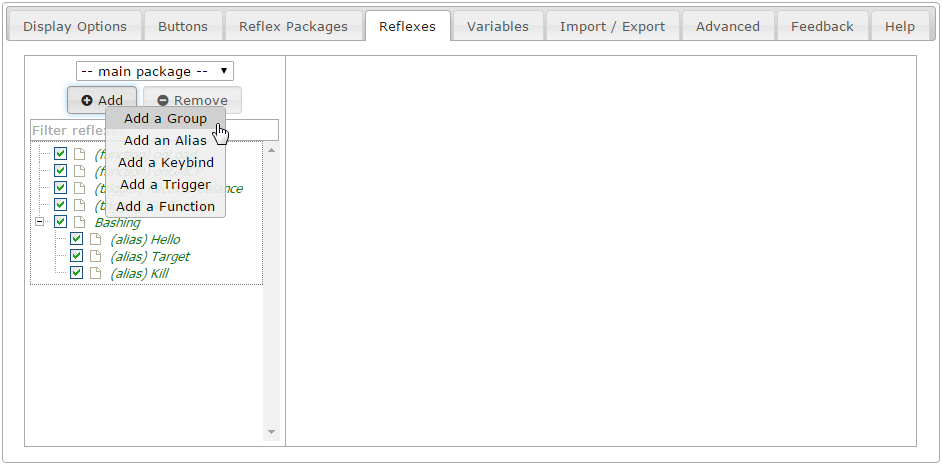
Reflexes is a term for all of the settings used to automate the game experience. In order to create a new reflex group you must click on the 'Reflexes' tab as shown in the image below. | |||
[[File:group-create.png]] | [[File:group-create.png]] | ||
=== Step 2. Click the 'Add' Button and select 'Add a Group'. === | |||
There are several different reflexes you can create. We want to create a group to organize them. In order to do this, click the 'Add' button located in the left pane and then click on 'Add a Group'. | |||
[[File:group-blank.png]] | [[File:group-blank.png]] | ||
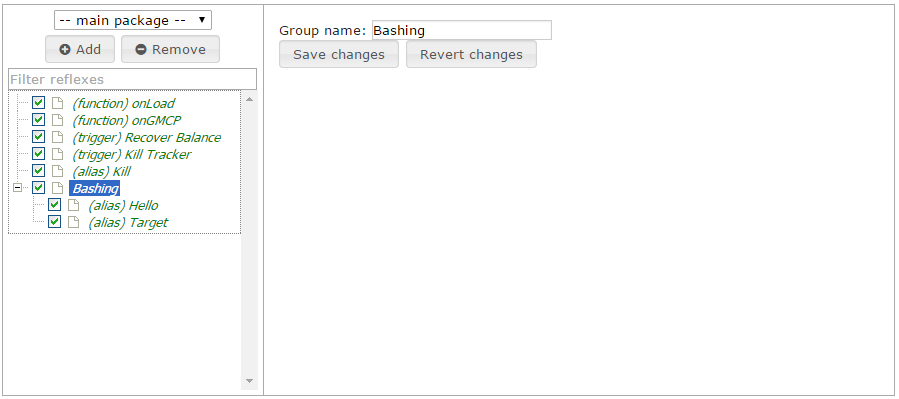
Once you have created a new group you can give it a name. In this example we are naming it '''Bashing'''. | |||
=== Step 3. Drag your Reflexes into a Group === | |||
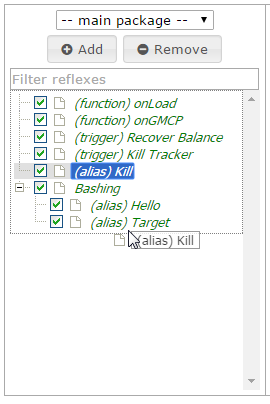
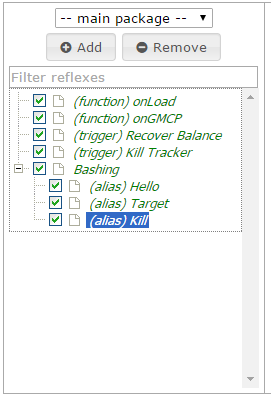
You can now drag and move your reflexes into the group. In the example below, we move the 'Kill' alias into the 'Bashing' group. | |||
[[File:group-dragging.png]] | [[File:group-dragging.png]] | ||
[[File:group-dragged.png]] | [[File:group-dragged.png]] | ||
Revision as of 19:23, 8 July 2015
Groups are used to organize your reflexes.
Step 1. Open the settings page and click the 'Reflexes' tab.
Reflexes is a term for all of the settings used to automate the game experience. In order to create a new reflex group you must click on the 'Reflexes' tab as shown in the image below.
Step 2. Click the 'Add' Button and select 'Add a Group'.
There are several different reflexes you can create. We want to create a group to organize them. In order to do this, click the 'Add' button located in the left pane and then click on 'Add a Group'.
Once you have created a new group you can give it a name. In this example we are naming it Bashing.
Step 3. Drag your Reflexes into a Group
You can now drag and move your reflexes into the group. In the example below, we move the 'Kill' alias into the 'Bashing' group.


